![[logo]](/images/SimplyGenius.png)
Simply Genius .NET
Software that makes you smile
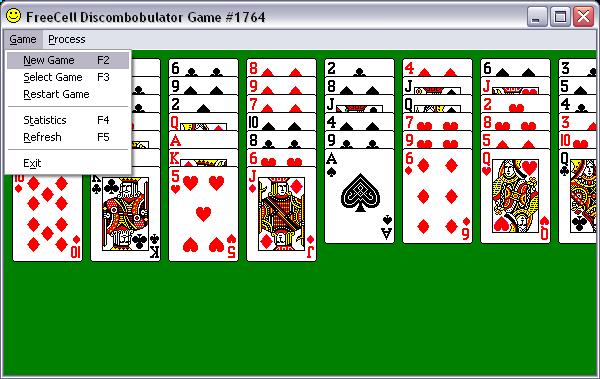
FreeCell Discombobulator

|
|
Publicly recommend on Google
|
Note: This app only works on Win 2K and Win XP!
Introduction
FreeCell is one of the games that come with Windows. The best thing about this game is that it is always winnable - unlike the other card games - which in my view makes it the best game. However, if you jump in too quickly, then you can easily get into an un-winnable position. This app allows you to move the cards around as you please to overcome this state.
Be warned though - if you "cheat" a lot, it can spoil the game.
Background
I came across an article called FreeCell & Hearts, Behind the scenes by Arik Poznanski and his detective work enabled me to write a discombobulator. I have not used any of his code, only the memory addresses and structure that he uncovered. He only found information for Win 2K and Win XP, which is why this app only works on these systems.
Using the app
When run, this app attaches itself to the first instance of FreeCell that is currently running. It reproduces the card array, and allows you to just drag and drop cards wherever you want them.
It also reproduces the Game menu, but these work a little differently to FreeCell: the "New Game", "Select Game" and "Restart Game" options all win your current game for you before performing their functions; and the "Statistics" option allows you to edit the values shown by FreeCell. The "Refresh" option just updates the state from FreeCell, but this should not be needed as the app refreshes automatically when activated.
The "Process" menu provides two options: "Kill" and "Restart". Both of these kill the current FreeCell process with extreme prejudice, but the "Restart" option starts a new instance of FreeCell. These options are useful if you just get fed up with the game.
There is also an "Easter Egg" function: press F12 and the discombobulator will line up the remaining cards by rank and suit; just double-click and you have won your game!
The code
Arik's article uncovered the memory addresses and structure used internally by FreeCell. This app uses this information to both read and write to the virtual memory of the FreeCell process. It does this by using the OpenProcess, ReadProcessMemory and WriteProcessMemory functions in Kernel32.
This app also controls the FreeCell process by simulating keyboard and mouse events. I used the SendKeys .NET class to simulate keyboard events, and the SendInput Win32 function from User32 to simulate mouse events.
The only other thing to mention is that I used Cards.dll to draw the cards, which made life easy.
Points of interest
Process memory access
I used the following declarations to access the functions in Kernel32:
[ DllImport( "Kernel32.dll", SetLastError = true ) ]
public static extern IntPtr OpenProcess
(
    UInt32 dwDesiredAccess,
    bool bInheritHandle,
    UInt32 dwProcessId
);

[ DllImport( "Kernel32.dll" ) ]
public static extern bool ReadProcessMemory
(
    IntPtr hProcess,
    IntPtr lpBaseAddress,
    byte[] lpBuffer,
    UInt32 nSize,
    ref UInt32 lpNumberOfBytesRead
);

[ DllImport( "Kernel32.dll" ) ]
public static extern Int32 WriteProcessMemory
(
    IntPtr hProcess,
    IntPtr lpBaseAddress,
    byte[] buffer,
    UInt32 size,
    ref UInt32 lpNumberOfBytesWritten
);
SendKeys
This .NET class sends keys to the foreground process, so I used SetForegroundWindow in User32 to bring FreeCell to the front before sending the required keys:
[ DllImport( "User32.dll" ) ]
public static extern bool SetForegroundWindow
(
    IntPtr hWnd
);
SendInput
This was a bit tricky to use. I used the following PInvoke declarations:
internal class INPUT
{
    public const int MOUSE = 0;
    public const int KEYBOARD = 1;
    public const int HARDWARE = 2;
}

internal class MOUSEEVENTF
{
    public const int MOVE = 0x0001 ; /* mouse move */
    public const int LEFTDOWN = 0x0002 ; /* left button down */
    public const int LEFTUP = 0x0004 ; /* left button up */
    public const int RIGHTDOWN = 0x0008 ; /* right button down */
    public const int RIGHTUP = 0x0010 ; /* right button up */
    public const int MIDDLEDOWN = 0x0020 ; /* middle button down */
    public const int MIDDLEUP = 0x0040 ; /* middle button up */
    public const int XDOWN = 0x0080 ; /* x button down */
    public const int XUP = 0x0100 ; /* x button down */
    public const int WHEEL = 0x0800 ; /* wheel button rolled */
    public const int VIRTUALDESK = 0x4000 ; /* map to entire
                                            virtual desktop */
    public const int ABSOLUTE = 0x8000 ; /* absolute move */
}

[ StructLayout( LayoutKind.Sequential ) ]
internal struct MOUSEINPUT
{
    public int dx;
    public int dy;
    public int mouseData;
    public int dwFlags;
    public int time;
    public IntPtr dwExtraInfo;
}

[ StructLayout( LayoutKind.Explicit ) ]
internal struct Input
{
    [ FieldOffset( 0 ) ] public int type;
    [ FieldOffset( 4 ) ] public MOUSEINPUT mi;
    [ FieldOffset( 4 ) ] public KEYBDINPUT ki;
    [ FieldOffset( 4 ) ] public HARDWAREINPUT hi;
}

[ DllImport( "User32.dll" ) ]
public static extern UInt32 SendInput
(
    UInt32 nInputs,
    Input[] pInputs,
    Int32 cbSize
);
The MOUSEINPUT struct uses a truly bizarre co-ordinate system: the screen is mapped to a scale from 0 to 65535 in both axis. So I used the following code to convert from pixels to the required values:
Rectangle screen = Screen.PrimaryScreen.Bounds;
int x2 = ( 65535 * x ) / screen.Width;
int y2 = ( 65535 * y ) / screen.Height;
I then used these values to create an array of Input structs to simulate a double-click:
Input[] input = new Input[ 4 ];

for ( int i = 0 ; i < input.Length ; i++ )
{
    input[ i ].type = INPUT.MOUSE;
    input[ i ].mi.dx = x2;
    input[ i ].mi.dy = y2;
    input[ i ].mi.dwFlags =
              MOUSEEVENTF.MOVE | MOUSEEVENTF.ABSOLUTE;

    if ( ( i % 2 ) == 0 )
        input[ i ].mi.dwFlags |= MOUSEEVENTF.LEFTDOWN;
    else
        input[ i ].mi.dwFlags |= MOUSEEVENTF.LEFTUP;
}
Then it is simple to call the SendInput function:
User32.SendInput( ( UInt32 ) input.Length, input,
                         Marshal.SizeOf( input[0]));
Double-buffering
You need to set three styles to double-buffer a Control ( a Form is derived from Control ):
public Form1()
{
    SetStyle( ControlStyles.UserPaint            , true );
    SetStyle( ControlStyles.AllPaintingInWmPaint , true );
    SetStyle( ControlStyles.DoubleBuffer         , true );

    InitializeComponent();
}
Conclusion
This little app has been quite fun to write. It proved to be easier than I thought to take control of another process, and to extend it in ways the original authors didn't expect.
History
- October 5th, 2005 - version 1.
License
This article, along with any associated source code and files, is licensed under The Code Project Open License.
Contact
If you have any feedback, please feel free to contact me.