![[logo]](/images/SimplyGenius.png)
Simply Genius .NET
Software that makes you smile
NTFS Hard Links

|
|
Publicly recommend on Google
|

Introduction
I have some classes that I reuse in many projects. I wanted a way to share these files between projects, while always updating a "master" copy that is the latest version. The NTFS support for hard links seems to be an answer. I can now keep all the master files in one directory, and link to the files I want to use from individual projects.
Background
NTFS hard links allow a file to appear in more than one directory with more than one name. Unix users will be familiar with this concept.
Because this can get very confusing very quickly, I have assumed some rules.
Rules
- Real files are stored in just a couple or so directories. I use "C:\dev\Common" and "C:\dev\Common\Icons".
- Link files are stored in a separate directory to the rest of the project files. I use "<project>\Common" and "<project>\Icons".
- Link file names are the same as the real file names.
Using the code
- First, create your real file directory using Explorer.
- Add your common files to this directory using Explorer. I have included the file Cursors.cs from my Wait Cursor article to get you started.
- Create your link directory using Visual Studio. In Solution Explorer, right-click your project and select "Add/New Folder". Name it "Common".
- Fire up the HardLinks exe. Click the Add Directory button ( Open File icon ).
- Set your real and link directories in the dialog and press ok.
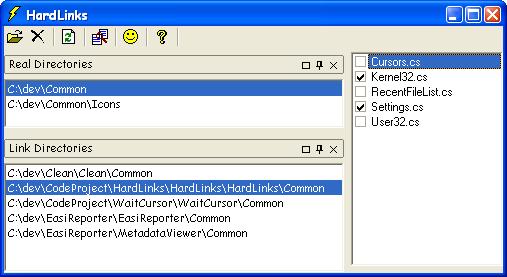
You should now have your real and link file directories selected in the list boxes on the left, and the Cursors.cs file in the checked list box on the right.
- Check Cursors.cs to create a link file. If you look at your link file directory with Explorer, you will see the Cursors.cs file. We know that this is really a link, not a separate file.
- Go back to Visual Studio and right-click your Common folder in your project. Select "Add/Add Existing Item" and pick the Cursors.cs file.
You now have the link to the real file in your project.
This may seem a bit complicated, but it gets easier as you add more common files.
Points of Interest
The checked list box on the right lists all the files in the selected real directory. The check state indicates the files in the link directory.
You can see the Legend from the context menu, but here are the states and their meanings :
- Unchecked : No file exists
- Indeterminate : File exists, but is a real file not a link
- Checked : Link exists.
Be careful not to delete real files!
This applies to icon files especially, as Visual Studio overwrites them when you edit them, instead of just updating their contents. If you have to edit an icon file, then manually select the file in your real file directory, or you will just make a copy in your link file directory which is what we're trying to avoid.
The code is not very interesting. It is mostly GUI stuff, but I have included it in case you want to modify it.
WinDiff
I have included this app in the zip files. It is an optional install with Visual Studio - under C++ Tools I seem to remember.
Point to the exe in the Options, or just put the exe in the application directory and you can immediately compare the currently selected real and link file directories.
Acknowledgements
I used the Magic Docking Library by Phil Wright. It made life very easy, so I give it a 5.
History
- 2004 March 6 : First version.
License
This article, along with any associated source code and files, is licensed under The Code Project Open License.
Contact
If you have any feedback, please feel free to contact me.